ci-cd-gha-aws
CI/CD pipeline with GitHub Actions and AWS Elastic Beanstalk
![]()
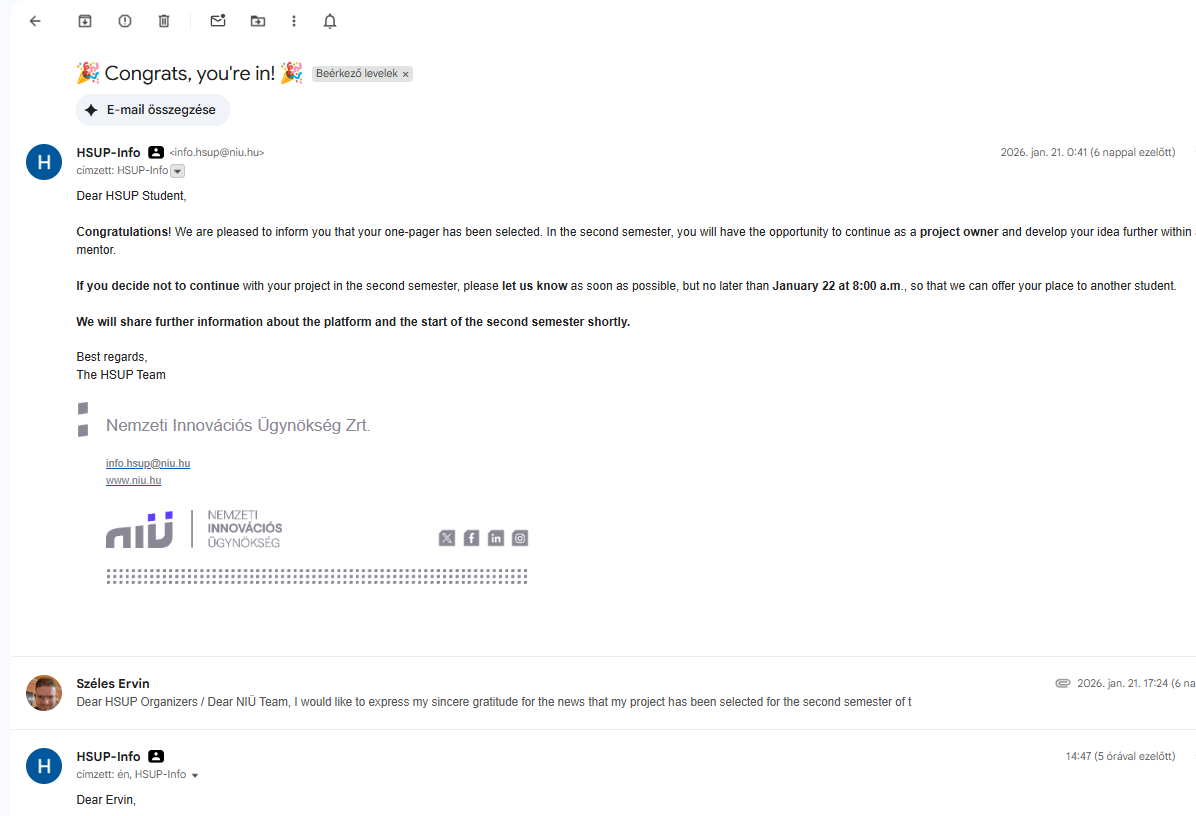
🏆 Concept selected by the Hungarian National Innovation Agency-NIÜ for HSUP
This repository demonstrates a professional-grade CI/CD pipeline. The project’s architectural concept was selected by the professional jury of the Hungarian National Innovation Agency-NIÜ for the Hungarian Startup University Program (HSUP), providing essential professional validation.
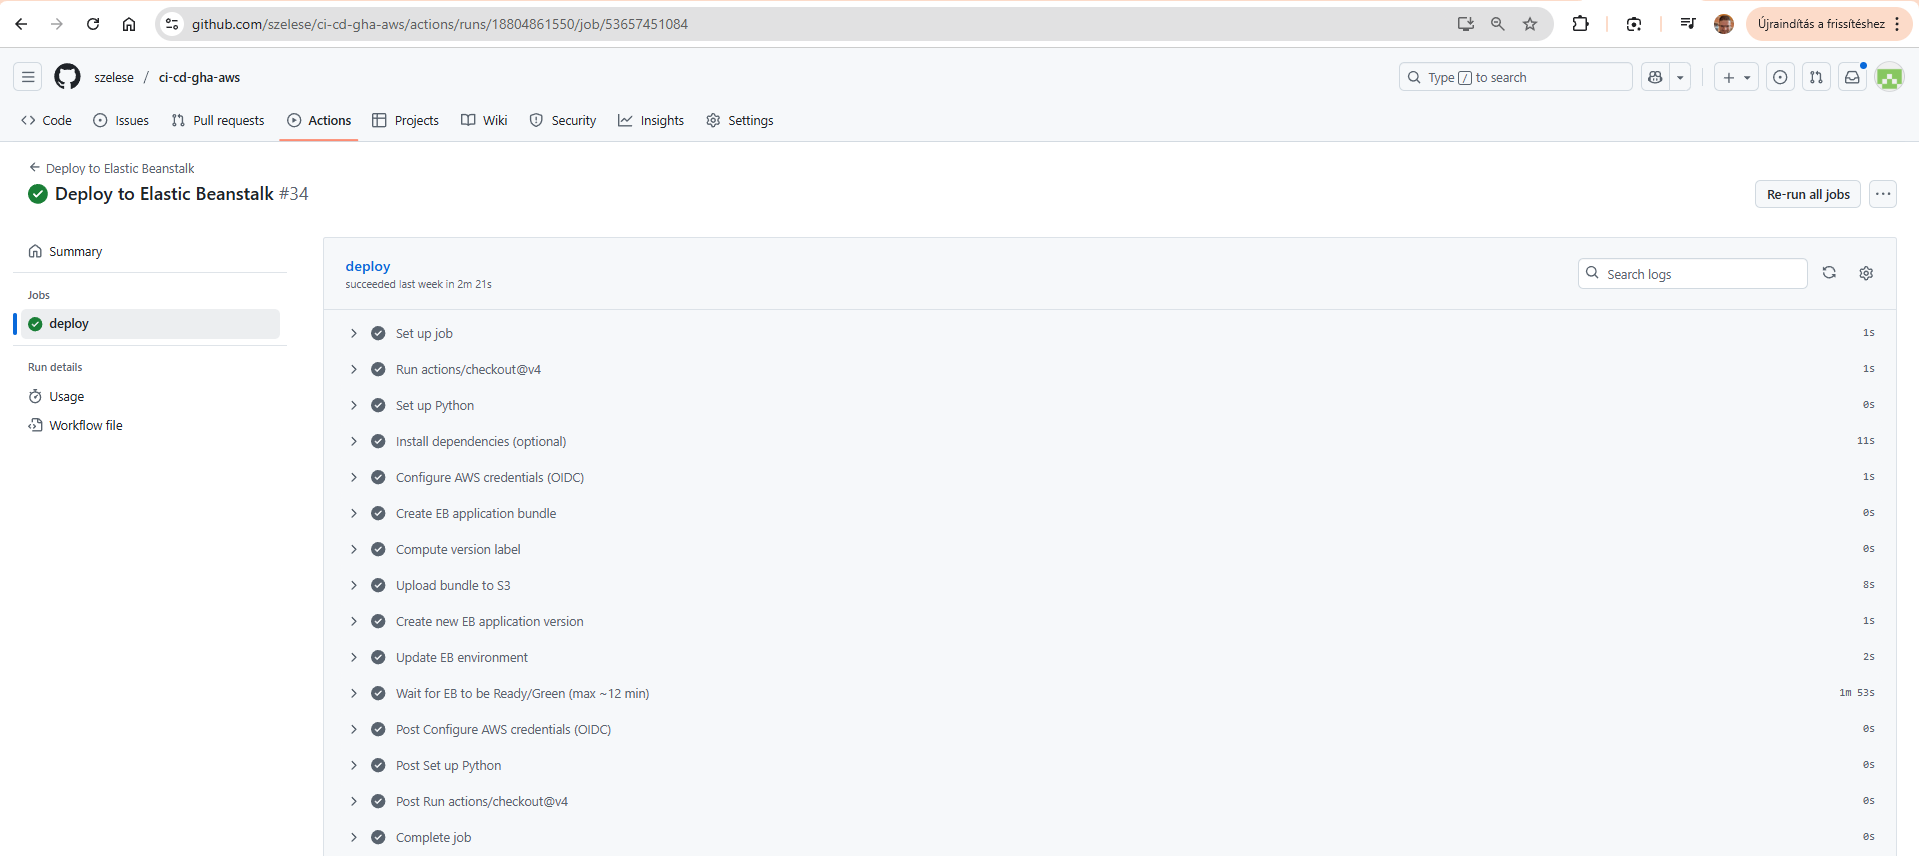
1. The Successful CI/CD Pipeline (GitHub Actions):
Below: the successful run of the deploy.yml workflow, including all build, test, and deploy steps.
2. The Deployed Application (AWS Elastic Beanstalk): This image shows the live Django application. You can visit the deployed site directly at the link below:
Demo site suspended for cost reasons.

🎓 Thesis Context & Deep Dive Analysis
This repository serves as the practical implementation for my engineering thesis.
While this README summarizes the “how,” the full academic paper provides the deep “why,” including:
- DORA Metrics: Detailed analysis of the “Elite” performance across all four key DORA metrics (Lead Time, Deployment Frequency, Change Fail Rate, and MTTR).
- ROI Analysis: The full cost-benefit calculation ($21,600 savings vs. $108 cost /year).
- Troubleshooting Logs: The complete “lessons learned,” including the IAM/CloudTrail debugging, the Degraded Health Check fix, and the GDPR incident response.
- Load Testing: The full results from the Locust tests that proved horizontal auto-scaling.
You can download the full PDF documents here:
- 🇬🇧 English Version (PDF) — Annex1-Step-by-Step Implementation Guide
- 🇬🇧 English Version (PDF) — Annex3-Performance Metrics and Load Testing
🛠️ Architecture & Workflow
This diagram illustrates the complete CI/CD process from a developer pushing code to the application being live on AWS.
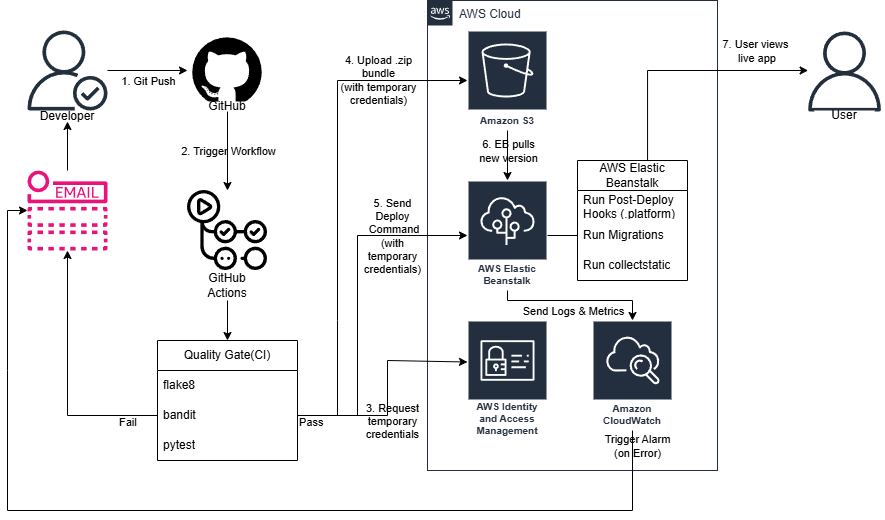
The workflow executes the following steps:
- Trigger: A developer pushes a commit to the
mainbranch, which automatically triggers the GitHub Actions workflow. - CI Quality Gate: The code runs through a series of automated checks.
- Linting (
flake8): Checks code style and syntax. - Security (
bandit): Scans for common security vulnerabilities. - Testing (
pytest): Runs the full suite of unit tests. - If any check fails, the pipeline stops and alerts the developer via email.
- Linting (
- Assume AWS Role (OIDC): If the Quality Gate passes, the workflow securely requests temporary credentials from AWS IAM using OpenID Connect (OIDC). No static keys are used.
- Package & Upload: The workflow creates a
.zipbundle of the Django application and uploads it to an Amazon S3 bucket using its temporary credentials. - Trigger Deploy: GitHub Actions sends a deploy command to AWS Elastic Beanstalk, pointing it to the new application bundle in S3.
- EB Pull & Deploy: Elastic Beanstalk pulls the
.zipbundle from S3 and begins the deployment. - Run Post-Deploy Hooks: Once the new code is in place, Elastic Beanstalk automatically runs the scripts in the
.platform/hooks/postdeploy/directory to:- Run database migrations (
manage.py migrate). - Collect static files (
manage.py collectstatic).
- Run database migrations (
- Monitor & Alert: Amazon CloudWatch monitors the health of the live environment. If any errors or alarms are triggered (e.g., the environment turns “Red”), it sends an alert to the developer via email, closing the feedback loop.
- Live: The deployment finishes, and the user can view the new, updated version of the application.
🛠️ Local Setup
To run this project locally, you will need Python 3.11 and Git installed.
- Clone the Repository:
git clone https://github.com/szelese/ci-cd-gha-aws.git cd ci-cd-gha-aws - Create and Activate a Virtual Environment:
This isolates the project’s dependencies from your system.
# Create the environment python -m venv .venv # Activate it (Windows - Git Bash / PowerShell) source .venv/Scripts/activate # Activate it (macOS / Linux) # source .venv/bin/activate - Install Dependencies:
Install all required packages from the requirements file.
pip install -r requirements.txt - Run Database Migrations:
This sets up the initial Django database schema (a local
db.sqlite3file will be created).python manage.py migrate - Run the Local Server:
python manage.py runserver - View the Application:
Open your browser and navigate to
http://127.0.0.1:8000/. You should see the application running.
☁️ Deployment & Configuration (AWS & GitHub)
This project is configured for automated, secure deployment using GitHub Actions (OIDC) and AWS Elastic Beanstalk. To deploy this project to your own AWS account, you need to set up two things:
- AWS IAM Role: An IAM role that GitHub Actions can securely assume using OIDC.
- GitHub Secrets: Repository secrets that the workflow files (
ci.yml,deploy.yml) will use.
1. AWS Setup (IAM OIDC Role)
You do not need to store static AWS Access_Key_ID or Secret_Access_Key as secrets. This repository uses OpenID Connect (OIDC) to securely request temporary credentials from AWS at runtime.
You need to create the following in your AWS account:
- An Elastic Beanstalk Environment: Create a new Elastic Beanstalk application and an environment (e.g.,
mysite-env-2) running on the Python 3.11 platform. - An OIDC Identity Provider: In the IAM console, create an Identity Provider for
token.actions.githubusercontent.comwith the audiencests.amazonaws.com. - An IAM Role: Create a new IAM Role (e.g.,
GitHubOIDC-EBDeploy) that trusts the OIDC provider (step 2). This role’s Trust Policy should be limited to your specific repository (szelese/ci-cd-gha-aws) andmainbranch. - Attach Permissions: Attach a minimal permission policy to this role. This policy must allow the role to perform the actions defined in the
deploy.ymlworkflow, such as:s3:PutObject(to upload the.zipbundle)elasticbeanstalk:CreateApplicationVersionelasticbeanstalk:UpdateEnvironment- (A detailed, step-by-step guide on finding these minimal permissions is detailed in steps 78-82 of the project’s thesis appendix.)
2. GitHub Secrets Setup
Go to your repository’s Settings > Secrets and variables > Actions and add the following repository secrets:
AWS_REGION: The AWS region where your Elastic Beanstalk environment is located (e.g.,eu-north-1).APP_NAME: The name of your Elastic Beanstalk application (e.g.,mysite).ENV_NAME: The name of your Elastic Beanstalk environment (e.g.,Mysite-env-2).AWS_IAM_ROLE_ARN: The ARN of the IAM role you created in the previous step (e.g.,arn:aws:iam::123456789:role/GitHubOIDC-EBDeploy).DJANGO_SECRET_KEY: A new, strong, randomly generated Django secret key for your application.
Once these steps are complete, any push to the main branch will automatically trigger the deploy.yml workflow, which will assume the IAM role via OIDC and deploy the application to your Elastic Beanstalk environment.
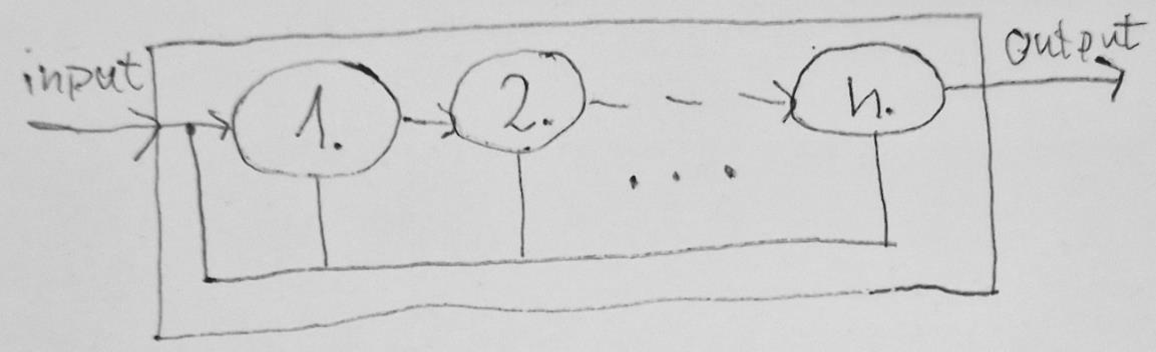
🏛️ Design Phase & Concept (v1)
Engineering Note: This design sketch represents the theoretical foundation of the project. The primary objective of Phase V1 was not complex application logic, but the demonstration of a secure, keyless (OIDC) CI/CD process within an AWS Elastic Beanstalk environment. This “template” established the groundwork for the subsequent agnostic approach, where automation and security are decoupled from the business logic.
📊 Performance & DORA Metrics (Thesis Analysis)
This project was not just about deployment, but also about rigorous measurement and optimization.
Detailed statistical data, including execution timings and load tests, can be found in the Performance Metrics Report.
Key Technical Achievements:
- Load Testing (Locust): Sustained 150.9 requests/second with a P99 latency of 395ms. Identified the Gunicorn/Network I/O bottleneck on t3.micro instances [v1_PerformanceMetricsAndLoadTesting PDF page 6].
- Deployment Lead Time: Achieved an average verified deployment time of < 60 seconds across 15+ iterations [v1_PerformanceMetricsAndLoadTesting PDF page 1].
- Auto-scaling & Self-healing: Successfully verified horizontal scaling and instance health recovery during stress tests [v1_PerformanceMetricsAndLoadTesting PDF page 7].
- Security-First Fine-tuning: Iterated the IAM Least Privilege policy 15+ times to reach an optimal security posture without compromising automated delivery. [v1_StepByStep.pdf Step 81]
🛠️ Technologies
- GitHub Actions
- AWS Elastic Beanstalk
- Python / Django
🌟 Featured Recognition
“The project’s architectural one-pager was selected by the professional jury of the Hungarian National Innovation Agency (NIÜ) for the Hungarian Startup University Program (HSUP), recognizing its innovative potential in cloud automation.”
Click to view the full recognition letter
🚀 Project Evolution
Status: V1 Baseline (Archived) This repository represents the foundational phase of my research. While this version is complete and served as the primary proof-of-concept for my thesis, the architectural evolution continues.
- v1 (This repo): Monolithic Django on AWS Elastic Beanstalk (PaaS).
- v2 (Active): Transitioned to a Cloud-Native, Serverless architecture using AWS Lambda and Docker with a Hexagonal Design pattern.
Check out the next evolution here: Project v2 Repository
✍️ Author
Ervin Wallin (formerly Ervin Széles) —
⚖️ Legal Notice
This repository and its contents were created as part of a Bachelor’s thesis project at Gábor Dénes University.
They are shared for educational and demonstration purposes only.
You are welcome to view and learn from this project,
but re-use or modification requires prior permission from the author.
The author assumes no responsibility for any issues, damages, or errors resulting from the use of these materials.
Ervin Wallin (formerly Ervin Széles) © 2025